.png)

How to use Twitter (X): 10 steps to get started the right way
Twitter, now commonly called X, is one of the fastest ways to learn, share ideas, and connect with people who care about the same topics you do. If you’ve ever opened the app and thought, “Where do I even begin?”, this guide will walk you through how to use twitter from setup to your first post, and then how to keep your account active without burning out.
Here’s the simple 10-step plan we’ll follow:
- Set up your profile
- Follow relevant accounts
- Learn the Twitter/X lingo
- Decide what you’ll post about
- Choose your voice (tone + personality)
- Write your first post (tweet)
- Join trending hashtags and conversations
- Maintain your channel with a realistic routine
- Use helpful tools and built-in features
- Build good habits (etiquette, safety, and consistency)
Step 1: Set up your profile
Before you post anything, make your profile look real and recognizable. People decide whether to follow you in seconds, and your profile does a lot of that work for you.
Choose a handle and display name
- Handle (@username): Keep it short, readable, and easy to remember.
- Display name: This can be your real name, brand name, or niche keyword (helpful for discoverability).
Add a profile photo and header
- Profile photo: A clear headshot (for individuals) or a clean logo (for brands).
- Header/banner: Use this space to show what you do, product, vibe, tagline, or proof (like “new episodes weekly,” “commissions open,” etc.).
Write a strong bio (without trying too hard)
You don’t need to sound like a corporate ad. Aim for:
- what you do
- who it’s for
- what you post about
- a little personality
Add your link (and make it count)
If you want traffic off-platform, use your profile link strategically: your website, portfolio, storefront, newsletter, booking page, or a link hub.
Pick privacy + notifications
- Public is usually best if your goal is growth, community, or visibility.
- Adjust notifications so you don’t get overwhelmed (you can always refine later).
Step 2: Follow relevant accounts
Following is the fastest way to shape your timeline into something useful, and it also helps you become visible to others.
Start with a “starter set”
Follow:
- people in your niche (creators, founders, freelancers, builders, designers, marketers, etc.)
- accounts you genuinely learn from
- communities and topic pages you want to participate in
Don’t only follow “big accounts”
Smaller accounts often reply more, interact more, and are easier to build relationships with. A healthy mix usually works best:
- larger thought leaders (for learning + trends)
- mid-size peers (for consistent engagement)
- smaller niche accounts (for real conversations)
Engage early (even before you post)
Replying thoughtfully is one of the quickest ways to get noticed. A few solid replies per day can beat posting into the void.
Step 3: Understand the Twitter/X lingo
Twitter has its own language. Once you know the basics, everything gets easier, from reading the timeline to joining conversations.
Quick tip: If you’re unsure what something means, click around the post’s actions (reply/RT/quote/bookmark). You’ll learn the platform faster by doing than by reading definitions.
Step 4: Decide what content to post
If you want a clear path (instead of random posting), pick a few content “buckets.” This keeps your account consistent while still giving you variety.
Choose 2–4 content pillars
Examples:
- teaching (tips, mini guides, frameworks)
- behind-the-scenes (process, lessons, wins/fails)
- commentary (opinions on news/trends in your niche)
- community (questions, polls, shoutouts, conversations)
- promotion (offers, products, blog posts, but not nonstop)
Keep your first month simple
For the first 2–4 weeks, aim for:
- one “value post” every few days
- a few replies per day
- one question or poll weekly
That’s enough to learn what works without forcing it.
Step 5: Choose your Twitter voice
Your “voice” is your style: how you write, how formal you are, how spicy your opinions are, and how you interact.
Pick a lane (and keep it human)
Options that usually work well:
- Friendly expert: helpful, calm, practical
- Curious builder: learning out loud, sharing progress
- Entertaining commentator: fun takes, memes, personality
- Direct operator: blunt, clear, high-signal posts
Rule of thumb: If you wouldn’t say it to a real person in your industry, don’t post it just to “sound smart.”
Step 6: Write your first tweet (post)
Posting is simple technically, what matters is clarity. Your first post doesn’t have to be viral; it just needs to make sense.
A few beginner-friendly formats
- Intro post: who you are + what you post
- Quick tip: one useful insight + example
- Short story: problem → lesson → takeaway
- Question: invite people to share their experience
- Mini list: “3 tools I use for…”
Add extras when they support the message
You can attach:
- links (useful for blogs, products, resources)
- images (screenshots, visuals, carousels)
- videos/GIFs (quick demos or personality)
- polls (easy engagement starter)
- emojis (sparingly, clarity first)
Micro-habit that helps: Proofread once for typos, once for tone, once for “would a stranger understand this?”
Step 7: Join trending hashtags and conversations
Hashtags and trends help you show up in places beyond your follower list, but only if you use them with intention.
How to use hashtags without looking spammy
- Use 1–3 relevant hashtags, not 12
- Pick hashtags tied to real communities (not just huge generic tags)
- Follow a few hashtags so you see what people post there
Use location + language wisely
Trends are different by region and language. If your audience is local (or you want it to be), your location settings can make discovery easier.
Branded hashtags (optional, but useful)
If you post recurring content (weekly tips, newsletter drops, episode releases), a simple branded tag helps people recognize your series.
Step 8: Maintain your channel (without burning out)
Consistency beats intensity. It’s better to post a little, regularly, than to post 30 times in one week and disappear for two months.
Keep a simple routine
Try:
- 10 minutes: reply to a few posts
- 10 minutes: draft or schedule one post
- 5 minutes: bookmark ideas for later
If you keep it small, you’ll actually stick to it.
Step 9: Use Twitter tools and features
Once you’ve posted a bit, tools and built-in features can help you stay organized, grow relationships, and keep your content consistent.
Built-in features worth using
- Pinned post: highlight your best intro, offer, or top resource
- Bookmarks: save posts you want to reference later
- Lists: create niche feeds without cluttering your main timeline
- Analytics: learn what topics and formats get engagement
- Video + media: keep your content mix interesting
- Customer care account (brands): separate support from marketing posts
Tools list to make Twitter/X easier
Below are practical tools that help you grow and manage your presence, starting with TweetPeek.
1) TweetPeek (Browser Extension for X)
TweetPeek is a browser extension for X (Twitter) built to help you grow your account through smarter networking, without turning your day into a manual follow/unfollow grind. While it also supports creating, previewing, and scheduling posts, its biggest advantage is how it helps you build (and clean up) your follower network with control and transparency.
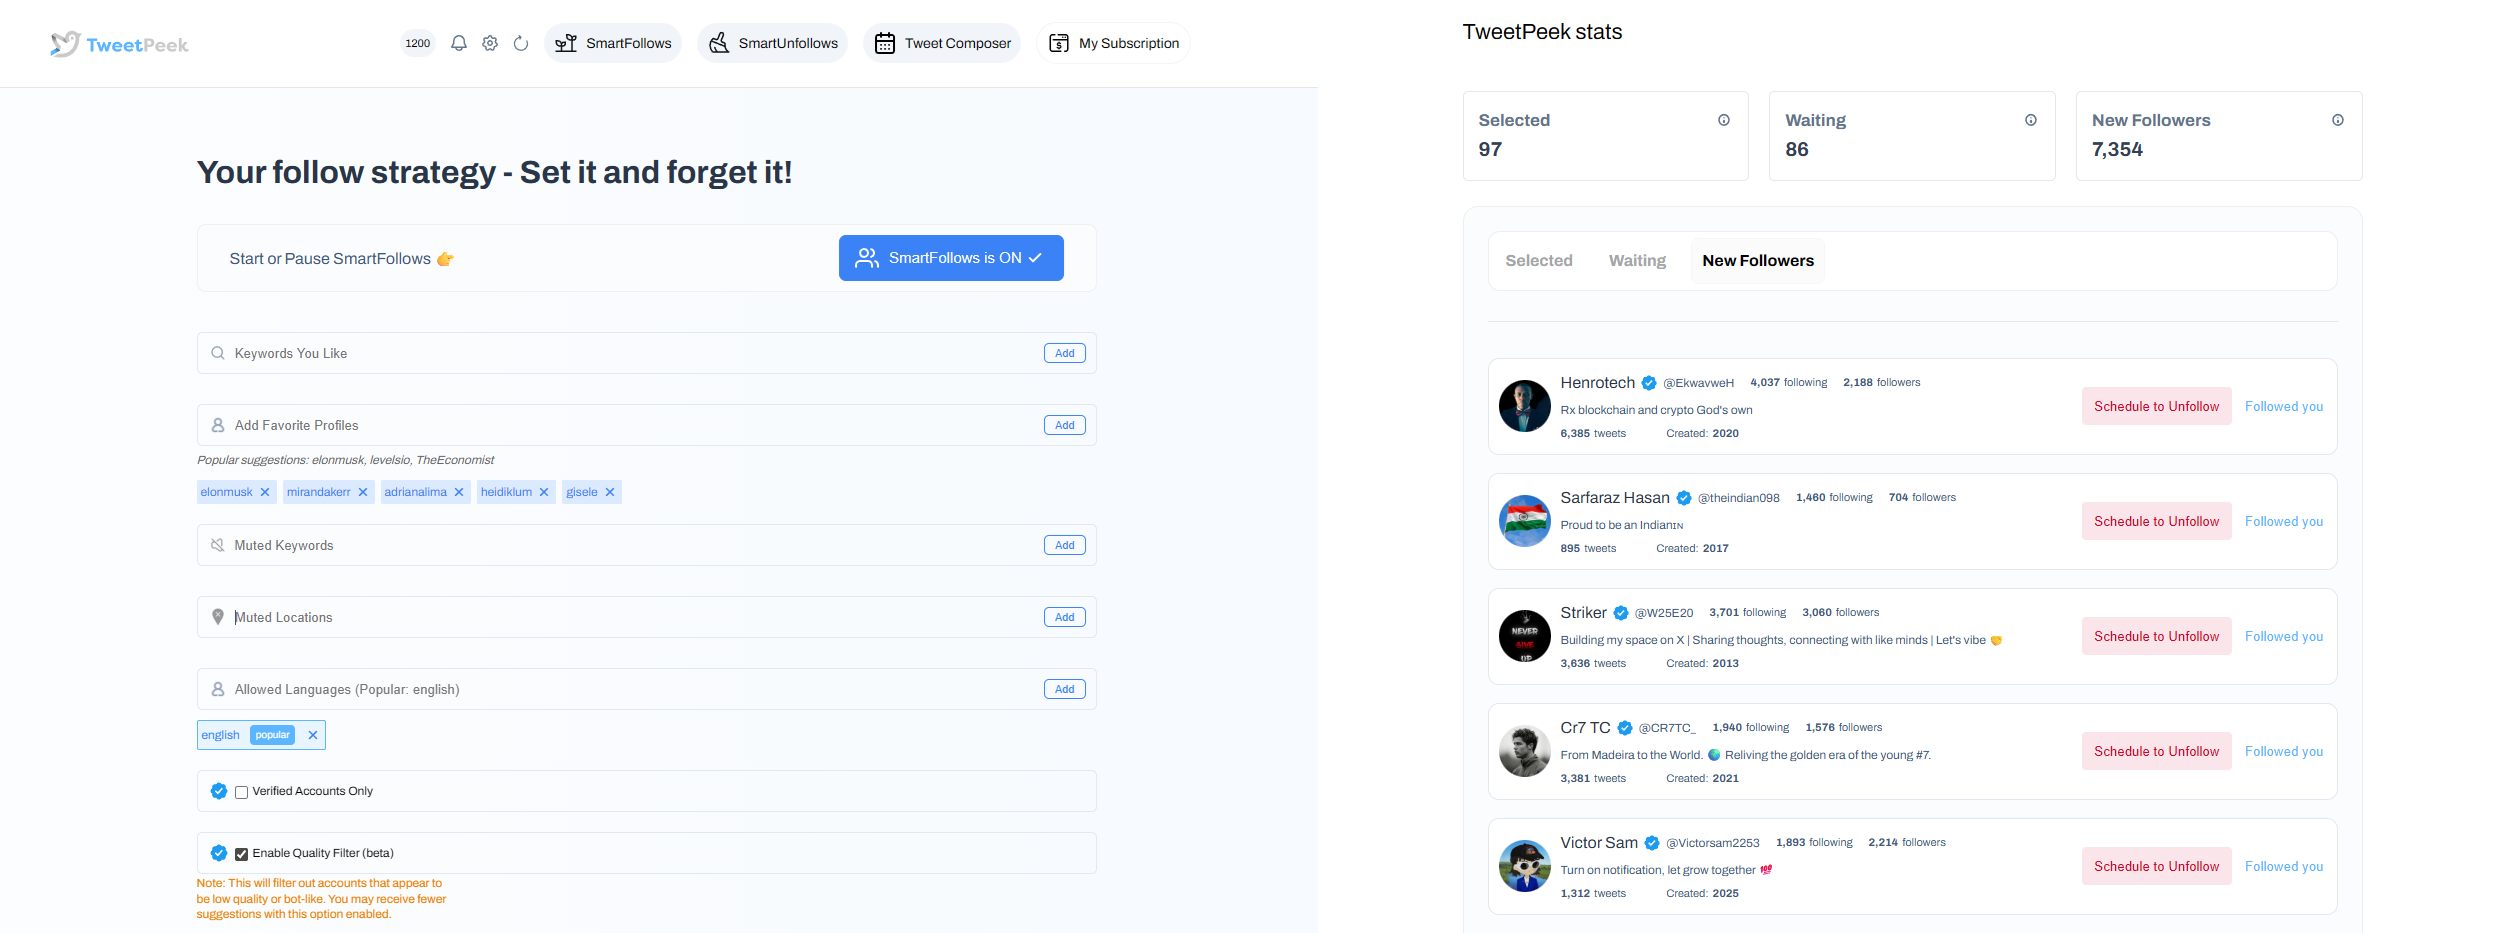
Smart Follows
TweetPeek’s Smart Follows helps you find and follow people who actually match what you’re interested in, automatically.
- Automatically follows people who match your interests
- If they don’t engage back, Smart Follows unfollows them for you
- Helps you:
- Find relevant people to follow
- Find people who are likely to engage
- Find people who are likely to follow you back
Targeting controls you can use:
- Keywords you like
- Favorite Profiles
- Mute Keywords
- Locations
- Languages
- Option: only follow verified accounts (if enabled)
Transparency (so you’re not guessing):
- You can see accounts selected to be followed
- You can see accounts that already followed back
Smart Unfollows
TweetPeek also makes it easy to clean up your following list, without guesswork or endless scrolling.
- See who isn’t following you back and decide whether to engage or unfollow
- Helps you easily find people who aren’t following you back
Filtering + sorting controls:
- Search accounts
- Filter: unfollowers, verified, languages
- Sort: followers, following, last active, tweets count (low→high / high→low)
Actions you can take:
- Batch unfollow results
- Whitelist accounts so they will never be unfollowed
Why TweetPeek stands out
Because it’s an extension, TweetPeek fits naturally into how you already use X in your browser, no complicated dashboard to “maintain.” Its Smart Follows + Smart Unfollows focus on helping you build a relevant network while keeping your following list clean and intentional. And since consistency matters, it’s helpful that it also supports drafting/previewing/scheduling posts so you can stay active even on busy weeks. The big win is that it encourages a responsible, non-aggressive approach: use targeting thoughtfully, review selections, and avoid spammy behavior.
TweetPeek can also help you create, preview, and schedule posts, which is handy when you want to batch content and stay consistent.
2) X Pro (formerly TweetDeck)
Best for: monitoring multiple feeds at once
If you’re active daily, a multi-column dashboard helps you track mentions, niche topics, and lists in one screen, great for community building and faster replies.
3) Buffer
Best for: simple scheduling + consistency
A straightforward way to plan posts ahead so you don’t disappear when work gets busy.
4) Hootsuite
Best for: teams and multi-account management
Useful if you manage multiple profiles, want approvals, or need a more structured workflow.
5) Canva
Best for: clean visuals fast
Templates, headers, quote graphics, and simple image posts can upgrade your profile instantly, without needing design skills.
6) CapCut (or any lightweight video editor)
Best for: short videos and quick edits
If video is part of your niche (tutorials, demos, product clips), editing speed matters more than fancy production.
7) Bitly (or a URL shortener)
Best for: cleaner links + basic tracking
Short links look better in posts and can help you track clicks when sharing content.
8) Link-in-bio tools (optional)
Best for: sharing multiple links from one profile
If you frequently share offers, content, and socials, a link hub keeps your profile link from changing every week.
Step 10: Build good habits (etiquette, safety, and growth)
If you want long-term results, your habits matter as much as your content.
Post like a person, not a billboard
- Be respectful (even when you disagree)
- Avoid dogpiling and quote-post rage bait
- Give credit when sharing ideas or screenshots
Protect your account
- Use strong passwords + 2-factor authentication
- Be cautious with third-party apps and extensions (only connect what you trust)
- Review connected apps occasionally and remove what you don’t use
Don’t forget to take breaks
The platform rewards attention, but you don’t owe it your sanity. A consistent routine is good, doomscrolling is not a strategy.
How to use Twitter FAQ
What is Twitter/X and how does it work?
Twitter/X is a social platform where people share short posts, react to others, and follow accounts to build a personalized timeline. You can reply, repost, quote posts with your own commentary, and message people privately.
What are the key features beginners should know?
Most beginners use these daily:
- Home timeline (posts from accounts you follow)
- Explore (trends and topic discovery)
- Notifications (mentions, likes, replies, reposts)
- Messages (DMs)
- Lists and bookmarks (organization and saving content)
- Spaces (live audio conversations)
How do you use Twitter properly?
A good baseline:
- Be respectful and avoid harassment
- Think before posting, screenshots live forever
- Use privacy settings intentionally
- Don’t hand out your password or connect sketchy tools
- Step away when it stops being productive
How do beginners start without overthinking?
- Follow 30–50 relevant accounts
- Reply to 3–5 posts per day
- Post 2–3 times per week using simple formats
- Watch what gets engagement and do more of that
Conclusion: a practical way to start (and stay consistent)
Now you know how to use twitter in a structured, beginner-friendly way: set up a solid profile, follow the right people, learn the lingo, post with intention, and keep a routine you can actually maintain. The secret isn’t posting 20 times a day, it’s showing up consistently, joining real conversations, and building relationships over time.
If you want extra help growing your network responsibly, TweetPeek is worth considering, especially for its Smart Follows and Smart Unfollows (plus the bonus of drafting/previewing/scheduling posts to stay consistent). Start simple, stay genuine, and let your account evolve as you learn what your audience responds to.

.png)
.png)
